How to Plan a Kitchen Extension (Without Losing Your Mind)
We’re about to take on one of our biggest projects yet…a kitchen extension.
The dream? More space, better flow downstairs, and finally a proper dining table where we can sit together as a family.
Right now, our kitchen works… but it doesn’t work for us. With two little ones, endless washing, and no cosy spot to eat or gather, we’ve realised how important it is to future-proof your home. When we first renovated, we didn’t think far enough ahead, and now here we are, planning the extension we really need.

(Our Current Kitchen)
Step 1: Start with the Floor Plan
Whenever I plan a kitchen, I begin with the floor plan. Free tools like floorplanner.com are brilliant for testing layouts and flow.
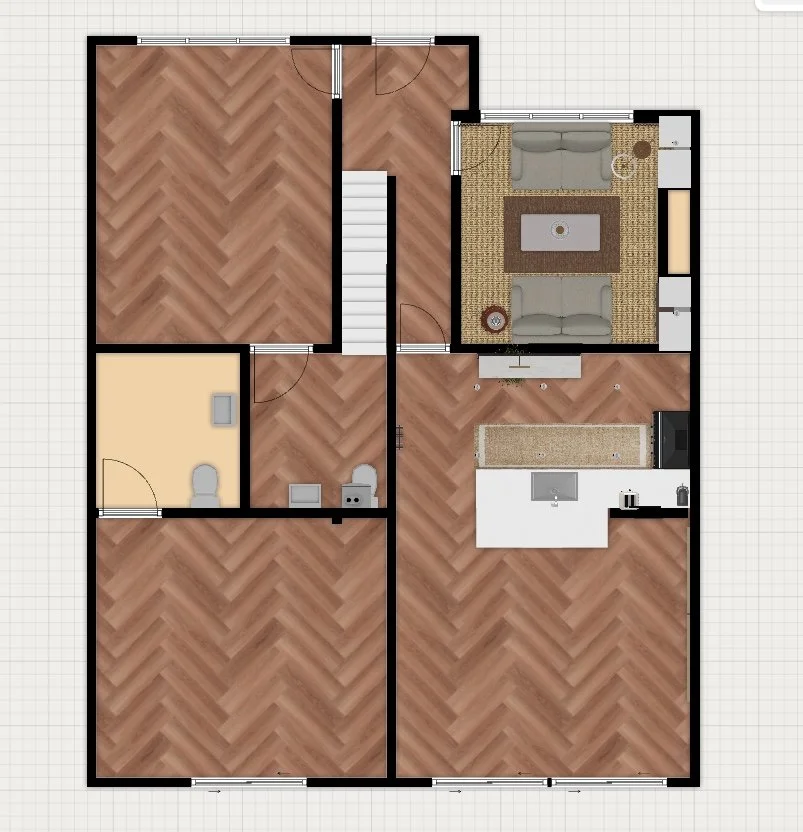
(Here’s a floorpan of what our downstairs could look like with a extension off the back and to the side)
It’s easy to assume something can’t be changed, but often that “impossible” wall is just a stud wall, not structural. Realising what’s possible can completely transform your design options.
This will be our third kitchen renovation (our main house, the house next door, and now this extension). If there’s one thing we’ve learned, it’s that even moving a doorway a little can change the whole feel of a space.
Step 2: Moodboards & Vibes
Once the layout feels right, I move on to moodboarding. Pinterest is my go-to, pulling inspiration that matches the look and lifestyle I want:
• Light and airy but still full of character
• Eclectic — mixing old, new, handmade, and found pieces
• Functional for family life (yes, I’m dreaming of a sofa and dining table in the same space!)
Moodboards don’t just shape the design, they help you picture how you’ll live in the space, not just how it will look.

(Original Kitchen Moodboard)
Step 3: Learn from Past Kitchens
Our current kitchen has taught us a few lessons:
• A north-facing aspect made the space darker than we expected (even with my beloved green cabinetry).
• Our parquet floor looked beautiful online, but darker in reality. Always test finishes in the room before committing.
• The biggest mistake? Not future-proofing. With two kids and constant laundry, we need flow, light, and storage. This time, the washer and dryer are going inside, built-in, no more cold garage runs.
Step 4: Splurge vs Save
Our big splurge will be bi-fold doors to connect the kitchen to the garden. But we’ll shop smart, second-hand, eBay, Gumtree.
Everywhere else, we’ll mix “budget luxury”:
• Second-hand finds (patience pays off 90% of the time)
• High street mixed with handmade
• Investing in small details that make the biggest difference
Truthfully, piecing a home together with history gives it soul. That’s where the magic is.
Step 5: DIY or Hire Help?
We’re lucky my husband’s a builder, but even then we’ve learned: time is money.
Ask yourself:
• Can I really do this to the standard I want?
• Will it take me so long that it ends up costing more?
It’s not easy for DIY-lovers to admit, but sometimes hiring a pro is the smartest choice.
Step 6: Budget Honestly
Yes, we set a budget. But renovations always go over.
Our approach? “Pay as you go.” Instead of a lump sum, we save and spend in stages. It takes longer, but it keeps us intentional and avoids debt spirals.
Step 7: Picture the End Result
Here’s how I imagine it:
• My youngest toddling across the open floor
• My oldest perched on a stool, “helping” without bumping into cupboards
• Family breakfasts at a real dining table
• Friends gathered in a space that finally feels warm and welcoming
Even if we move one day, I want the next family to walk in and feel that warmth too.
Practical Checklist for Your Kitchen Extension
1. Start with the floor plan → test layouts online.
2. Check what’s possible structurally → don’t assume you can’t move a wall.
3. Learn from past mistakes → every reno teaches something.
4. Moodboard the vibe → design for lifestyle, not just looks.
5. Pick your splurge → one wow feature is enough.
6. Budget smart → source second-hand, save as you go.
7. Ask the DIY question → when to hire help.
8. Future-proof → plan for kids, laundry, and real life.
Final Thoughts
Planning a kitchen extension is exciting, stressful, and a little messy. For us, it’s about creating a space that’s light, characterful, and family-friendly, without blowing the budget.
I’ll be sharing the process as we go: the wins, the chaos, and hopefully some inspiration for your own home. Because at the end of the day, a kitchen isn’t just cabinets and tiles…it’s the heart of the home.